Start your homelab with the low power GMKtec NucBox G3 mini PC based on Intel N100
Generally speaking a Homelab is a personal, non-commercial environment where individuals can set up, experiment with, and manage their own IT infrastructure. This can include a variety of hardware and software components, such as servers, networking equipment, virtualization platforms, storage systems, and more. However most people only need to host a few services such as home automation, personal websites, media servers or backup and storage.
There are plenty of videos on YouTube where users are showcasing their homelab setup, some of which are pretty advanced setups with rack-mounted servers and professional-grade networking gear. In fact, most users will never need all these and when you start a homelab you begin with a list of services you want to host.
Physical aspects
The first question you should ask is on how many physical locations will you deploy servers? For example you can have servers at your house and at your parents house and this brings some complexity since you will have to configure a site-to-site VPN tunnel to make everything work as if it was in a local network. However most people want self hosted services in a single physical location which can be simplified to a single server running behind a router.
But a single server in a single location makes it susceptible to data loss in case of hardware failure. More than that, the server is dependent on a single internet connection provided by your ISP. Yet this is the preferred choice of casual users as it has some advantages: full control over the server since it is at your place and low power consumption.
Because yes, power consumption is a factor you should take into account for a device that is supposed to be running 24/7. Even if you make your own electricity with photovoltaic panels for example, low power consumption is still important.
My requirements
Some years ago I’ve started with an MQTT broker running on discarded routers flashed with OpenWrt. I eventually switched to a single board computer (Orange Pi) and this has been running flawlessly in my home. However I need more:
- I want to switch all home automation from MQTT to Home Assistant (I will also keep the MQTT broker running);
- I need a VPN server to connect from remote places (client-to-site) for which I chose OpenVPN;
- A network ad-blocker would be a nice addition, such as AdGuard Home;
- I also have a few ebooks which I would like to manage with Calibre-Web.
Once you know the services you want, you must decide whether these will run directly on the server (as installed software or containerized) or on virtual machines on the server. Virtualization is usually better suited for powerful servers and it has the advantage of being more configurable, easy to backup, migrate or deploy simultaneously on multiple machines. Containerization on the other hand is lightweight and easier to manage if you are less experienced.
The services I require would probably run even on one of the powerful SBCs from Orange Pi or Raspberry Pi. But a mini PC is always a better choice since it comes with a case and power supply and the possibility to upgrade storage and RAM. One of the advantages of common SBCs is that they usually require slightly less power than a mini PC. Even so, an Intel N100 NUC will usually require less than 30 Watts of power while providing better performance (note that it peaks 30 W at load, while requiring only 6-7 W most of the time).
This is what I went for: the GMKtec NucBox G3 mini PC with 16 GB RAM and 1 TB storage. Regarding the software, to keep it lightweight, I used Ubuntu Server with Docker containers.
Setup overview
These are the steps required to get your homelab up and running on such a device:
- Install Ubuntu Server and Docker
- Set a static IP for the device in your local network and configure SSH access
- Put it in the right place and secure its power with UPS or battery backup
- Set up all containers with Docker Compose
- Configure each service running in containers
- Make a backup of all configuration or schedule regular backups to different storage
Security
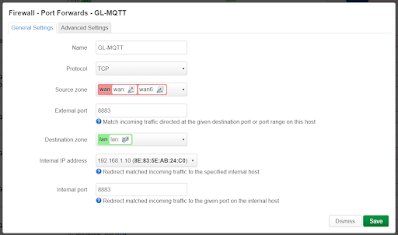
This server will usually be behind a router, protected by router’s firewall. You should be familiar with port opening (forwarding) procedure on your router. Here is an example for OpenWrt.
 |
| Port forwarding on OpenWrt firewall |
You have to select the source interface which is usually WAN, the destination interface (LAN) and the target IP (your homelab server static IP goes here). Then choose ports and protocol, save and apply. Note that the external port can be different from the internal port.
Next, to be able to access homelab services from the internet, your ISP must assign a public IP to your router. If this is static, just use it to connect. Otherwise if the public IP is dynamic, you have to use a third party dynamic DNS provider. There are even some containers which will update DNS records for common providers.
But before opening a port and exposing a service to the internet, make sure that service is properly secured. Switch to HTTPS for all web interfaces and use TCP/UDP over SSL/TLS for any other services. It is perfectly fine to use self signed certificates as long as you can verify them on the other end of the connection, although these may generate some warnings for clients in some cases.
Overview
These being said, I will continue this subject in the following posts:
- Setting up Ubuntu Server with Docker on Homelab NUC (coming soon)


No comments :
Post a Comment
Please read the comments policy before publishing your comment.