How to generate a self signed certificate for use with Mosquitto MQTT over TLS/SSL.
Following my previous post, you should have now a running Mosquitto based MQTT broker on your OpenWrt router that listens on port 1883 for unsecured clients and on port 8884 for TLS PSK clients. But that's not all. I want to have the broker listen to 8883 port for TLS certificate secured clients. I will use this port for remote clients over the internet.
Of course, the port can be used for local clients that support TLS. This is the highest level of transport encryption available. It's the same encryption used by HTTPS. When you (your browser) send a HTTPS request to a server (website), the server responds with its certificate and public key. The browser has a database of trusted certificate authorities and if the authority that issued the received certificate is in that database, browser will trust the server and will respond with data encrypted with the public key. Server decrypts data with its private key. Client and server will negotiate a one time key that will be used throughout the session.
Mosquitto MQTT over TLS works in the same way. Only the server has certificate and the key pair. But there is a setting for Mosquitto, require_certificate that requires a certificate from the clients. Enabling this, clients must provide a certificate and public key to the server (and have a matching private key to decrypt server's response). Unlike the server certificate and key, client's are used only for proving its identity to the server and not for encrypting data. It is required that both server and client certificates are signed by the same authority. Each client should have its own certificate (it's not mandatory, though; you can deploy the same certificate to all clients).
Certificate and key
Let's get to practical part (command line). OpenSSL will be used to generate all the files needed. It can be done even on the OpenWrt router, however you should use the computer. I'm running OpenSSL on Ubuntu, but there are also Windows binaries.
cd ~/Desktop
mkdir mosquitto
cd mosquitto
First, we'll generate a certificate authority (CA) which will be used to sign all the following server and client keys. You will be asked to enter a PEM passphrase (password). Remember what you enter here because you will use it later to sign the keys. Adjust the fields of -subj argument as you want. Or you can run the command without this argument and you will be prompted to enter each of the fields.
openssl req -new -x509 -days 365 -extensions v3_ca -keyout ca.key -out ca.crt -subj "/C=RO/ST=Home/L=Home/O=OneTransistor/OU=OneTransistor/CN=onetransistor.eu"
Now, let's generate server key and sign it with the certificate.
openssl genrsa -out server.key 2048
openssl req -new -out server.csr -key server.key -subj "/C=RO/ST=H/L=Home/O=MQTT Broker/OU=MQTT Broker/CN=mqtt-broker.lan"
openssl x509 -req -in server.csr -CA ca.crt -CAkey ca.key -CAcreateserial -out server.crt -days 365
openssl rsa -in server.key -out server.key
This time, -subj should contain information about your broker. Earlier you entered information about your (virtual) certificate authority. Make sure this time, the CN is your broker IP or domain name. You should have used different data for the CA! AT the third command, the PEM passphrase is required.
If you will require certificate from clients, let's generate one (you repeat this for every client):
openssl genrsa -out client.key 2048
openssl req -new -out client.csr -key client.key -subj "/C=RO/ST=H/L=Home/O=MQTT Client/OU=MQTT Client/CN=Thing01"
openssl x509 -req -in client.csr -CA ca.crt -CAkey ca.key -CAcreateserial -out client.crt -days 365
openssl rsa -in client.key -out client.key
The common name (CN) field is now very important. It will be used as username by the broker. Look into the mosquitto folder on your desktop (or wherever you generated the files). You should have two files (crt and key) for each CA, server and client.
Upload to router
Launch WinSCP and connect to router. On the left column, browse to the folder where you generated the certificates (mosquitto on Desktop). On the right column, go to /etc/mosquitto. Drag and drop, from left to right, ca.crt, server.crt and server.key.
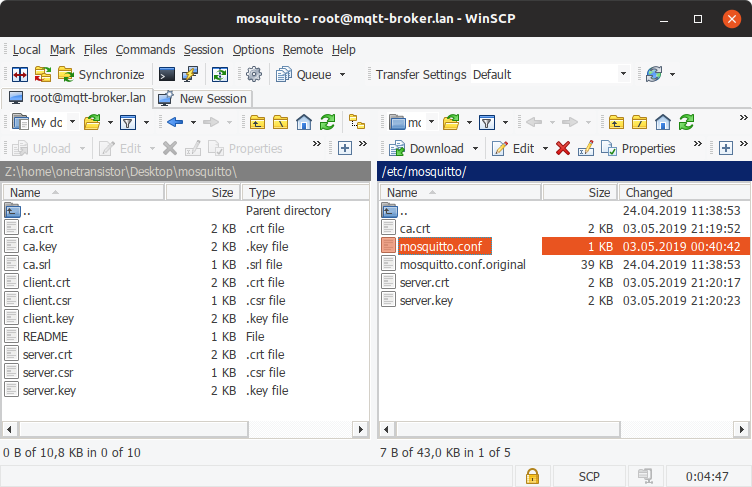
Files transferred to router using WinSCP
When using certificates it is also important that server and clients are configured with the correct date and time. The OpenWrt router must be able to connect to the internet. Open the web interface (LuCI) and go to Network - DHCP and DNS and at Server Settings - General Settings add DNS forwardings to 8.8.8.8 and 8.8.4.4. Next, go to System - System and set the correct timezone and valid NTP servers. You may also enable the included NTP server and set the clients to use it.
Broker configuration
Leave WinSCP session open and double click on mosquitto.conf. Assuming you already have the configuration from the previous post, put these lines inside, after the default listener (below line port 1883):
# Certificate listener
listener 8883
cafile /etc/mosquitto/ca.crt
certfile /etc/mosquitto/server.crt
keyfile /etc/mosquitto/server.key
require_certificate true
use_identity_as_username true
Stop Mosquitto from command line (PuTTY serial or SSH can run in parallel with WinSCP) using /etc/init.d/mosquitto stop. Now launch it with verbose on.
mosquitto -v -c /etc/mosquitto/mosquitto.conf
I tested the server with MQTT.fx running on my Ubuntu local client. Here is how to configure the connection.
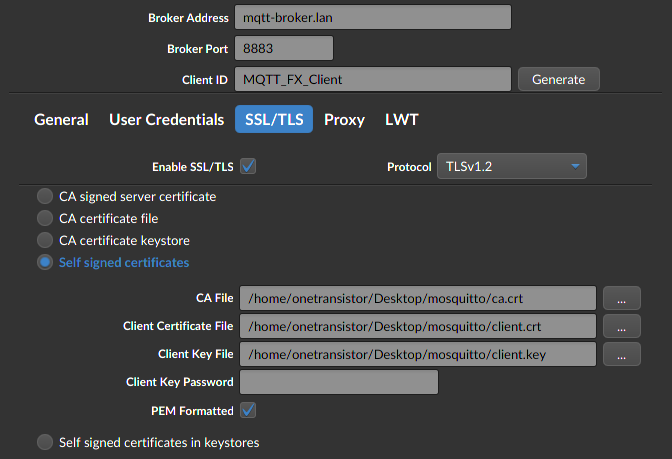
Configure SSL client on MQTT.fx
Connection to broker is successful, as proven by Mosquitto log on OpenWrt.
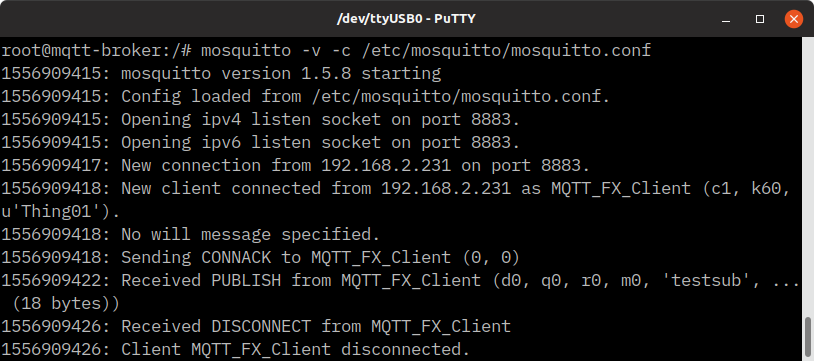
Mosquitto SSL client log
Other clients, like MQTT Explorer, do not accept client certificates and will not be able to connect to this broker. If you're using such clients, just remove, comment or set to false require_certificate true and use_identity_as_username true in the configuration. Now, client identification switches to password file, if set. It's highly recommended that if you use certificate to identify clients, don't use password file too. So, if you require certificate from clients, use the identity from certificate as username.
You're done. Kill the process with Ctrl+C and start the service (or restart the router).
/etc/init.d/mosquitto start
Overview
The complete mosquitto.conf file created for my server setup looks like this:
# Global
per_listener_settings true

# Default listener
port 1883

# Certificate listener
listener 8883
cafile /etc/mosquitto/ca.crt
certfile /etc/mosquitto/server.crt
keyfile /etc/mosquitto/server.key
require_certificate true
use_identity_as_username true

# PSK listener
listener 8884
psk_hint "mqttbroker"
use_identity_as_username true

# Security
allow_anonymous false
password_file /etc/mosquitto/passwords.txt
psk_file /etc/mosquitto/preshared.keys
Per listener settings are enabled first, then the default listener port is specified. After this, additional listeners may be configured, each with its own security settings. At last, some global security configuration and files are set. The configuration file is not hard to understand if you understand the parameters hierarchy.
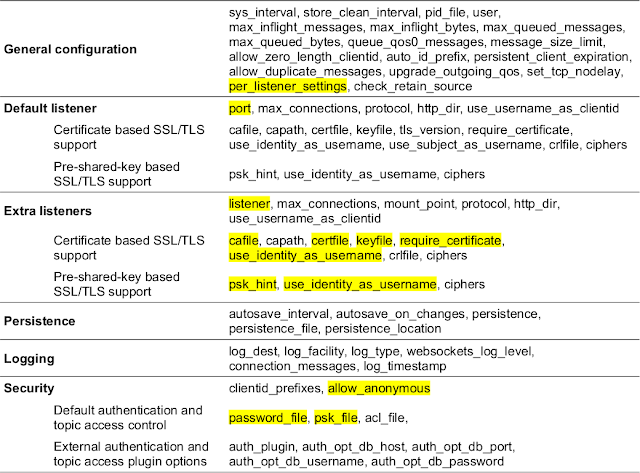
Configuration files parameters
Follow parameter order and set only what you want to change. The highlighted parameters in the above list were currently used. At the extra listeners section, add as many listeners as you want with listener <port>, followed by the available security settings.
Backup
Store the previously generated CA file on your computer (move them from the Desktop in a safe place) and remember the PEM passphrase. You need it for every client that will connect to the broker and also if you want to sign client certificates.
If you perform a firmware upgrade on OpenWrt router, you lose the uploaded files. In LuCI, go to System - Backup - Configuration, and add in the list:
/etc/mosquitto/ca.crt
/etc/mosquitto/server.crt
/etc/mosquitto/server.key
/etc/mosquitto/passwords.txt
/etc/mosquitto/preshared.keys

# Default configuration may be already in the list
/etc/mosquitto/mosquitto.conf
These files will now be included in the backup archive, when you generate it.
My own MQTT server is now configured and running. In future posts I will connect things to it.
References
The following pages were really helpful in creating this guide:


greatt
ReplyDeleteThis is maybe a silly question:
ReplyDeleteMy Internet Provider changes the IP dynamically. In a previous project I used a dynamic DNS hostname and installed DYNdns scripts on the same tp-lynk wr842nd that I'm using here. I could then reach my router from outside with a subdomain such as 'damn_mosquitto.dnshome.de'.
Do I use that subdomain as CN when generating the broker certificate? What should I use as CA?
Thanks a lot! It's a nice work and really detailed explanation!
Hi Pelado! This is a good question. For the subject of CA, use whatever you want. For the subject of server certificate, you should use CN=dnshome.de (the top level domain). I'm not sure if a different CN will cause any issues, though. It is important that both server and client certificates are generated using the same CA.
DeleteWoah! That was fast! I'll try to finish the server config right now (after work/before sleep ¯\_(ツ)_/¯).
DeleteI found your blog yesterday and got it running on a spare router just following the steps in about two hours. Your explanation on each point was really clear! Thanks a lot dude!
Best regards from Argentina!