Configure Eclipse or SW4STM32 to automatically upload compiled binary to STM32 blue pill and debug it using ST-Link SWD connection.
The blue pill is a STM32 development board which can be programmed in multiple ways. You can use Arduino IDE, mBed OS or HAL library from ST. This post is about STM32 development using HAL. There is a plugin for Eclipse that adds features for working with this family of microcontrollers (MCU) and there is also System Workbench for STM32 (SW4STM32), a complete development environment based on Eclipse IDE.
In a previous post I talked about STM32 development on SW4STM32. At that time I was just beginning with this MCU and after I was compiling the project binary, I used ST-Link tools to upload it to the board. That worked, but it was uncomfortable to launch ST-link utility or call st-flash after each build. More important, I lost all debug options with this method. I didn't knew then that Eclipse/SW4STM32 can be configured to automatically upload (burn) binary to MCU and debug it. Configuration procedure is a one-time process per project.
I assume you got Eclipse with STM32 or SW4ST32 installed and running. Additional information about setting them up can be found in my previous post. Let's create a sample project and then upload and debug it. Here is a sample blink code which turns on and off the built in LED at PC13 and counts LED transitions in counter variable (32 bit unsigned).
#include "stm32f1xx.h"

void SystemClock_Config(void) {
 RCC_OscInitTypeDef RCC_OscInitStruct = { 0 };
 RCC_ClkInitTypeDef RCC_ClkInitStruct = { 0 };

 // Initializes the CPU, AHB and APB busses clocks
 RCC_OscInitStruct.OscillatorType = RCC_OSCILLATORTYPE_HSE;
 RCC_OscInitStruct.HSEState = RCC_HSE_ON;
 RCC_OscInitStruct.HSEPredivValue = RCC_HSE_PREDIV_DIV1;
 RCC_OscInitStruct.HSIState = RCC_HSI_ON;
 RCC_OscInitStruct.PLL.PLLState = RCC_PLL_ON;
 RCC_OscInitStruct.PLL.PLLSource = RCC_PLLSOURCE_HSE;
 RCC_OscInitStruct.PLL.PLLMUL = RCC_PLL_MUL9;
 if (HAL_RCC_OscConfig(&RCC_OscInitStruct) != HAL_OK) {
  while (1)
   ;
 }

 //Initializes the CPU, AHB and APB busses clocks
 RCC_ClkInitStruct.ClockType = RCC_CLOCKTYPE_HCLK | RCC_CLOCKTYPE_SYSCLK
   | RCC_CLOCKTYPE_PCLK1 | RCC_CLOCKTYPE_PCLK2;
 RCC_ClkInitStruct.SYSCLKSource = RCC_SYSCLKSOURCE_PLLCLK;
 RCC_ClkInitStruct.AHBCLKDivider = RCC_SYSCLK_DIV1;
 RCC_ClkInitStruct.APB1CLKDivider = RCC_HCLK_DIV2;
 RCC_ClkInitStruct.APB2CLKDivider = RCC_HCLK_DIV1;

 if (HAL_RCC_ClockConfig(&RCC_ClkInitStruct, FLASH_LATENCY_2) != HAL_OK) {
  while (1)
   ;
 }

 //Enables the Clock Security System
 HAL_RCC_EnableCSS();
}

int main(void) {
 HAL_Init();
 SystemClock_Config();

 __HAL_RCC_GPIOC_CLK_ENABLE()
 ;

 GPIO_InitTypeDef builtin_led;
 builtin_led.Mode = GPIO_MODE_OUTPUT_PP;
 builtin_led.Speed = GPIO_SPEED_FREQ_LOW;
 builtin_led.Pin = GPIO_PIN_13;
 builtin_led.Pull = GPIO_NOPULL;

 HAL_GPIO_Init(GPIOC, &builtin_led);

 uint32_t counter;
 counter = 0;

 while (1) {
  counter = HAL_GetTick();
  HAL_GPIO_TogglePin(GPIOC, GPIO_PIN_13);
  HAL_Delay(500);
 }
}
System clock configuration code is generated by STM32Cube. In main(), I enable clock for GPIOC and set LED pin as output. An endless loop toggles the LED and increments a variable every 500 ms. Press Ctrl + B to build the binary (or Project - Build All). The active build configuration probably Debug. Go to Project - Build Configurations - Set Active and make sure Debug is selected. There's no problem with Release either. It can be uploaded to board but you won't be able to debug it.
If you haven't done it already, connect the blue pill to ST-Link and plug it into USB port. Let's configure binary uploading. Go to Project - Properties, select Run/Debug Settings and create a configuration by clicking New button. Select Ac6 STM32 Debugging and click OK.
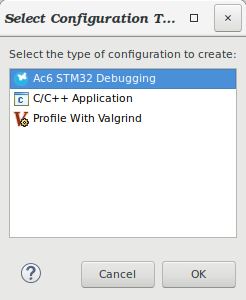
Select Ac6 Debug configuration
A new window appears where you set configuration properties. In the name field write whatever you want (1). While you are in Main tab, click Search project (2) and select the compiled binary (3). If you haven't built the project yet nothing will appear. If you built Release too, it will appear there and you can select it to be uploaded.
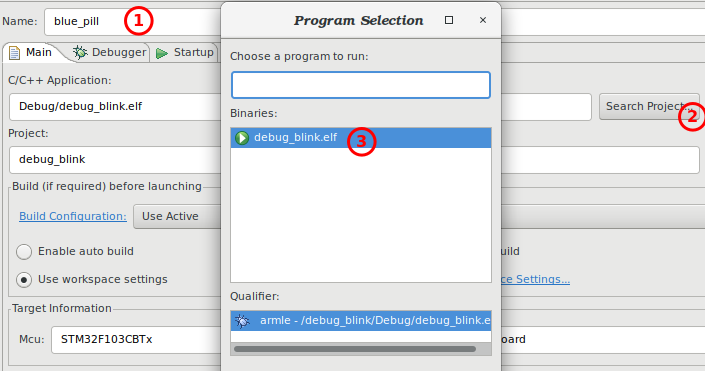
Select a binary to be uploaded to MCU
Move to Debugger tab. Here click Show generator options in Configuration Script section. From St-Link logs, I know my programmer clone uses 950 kHz SWD clock frequency. The Reset mode should be changed to Software system reset. Click Apply and close all dialog windows. A new file will be generated under project root folder. It is named after the name you set to the debug configuration and holds all properties you selected earlier.
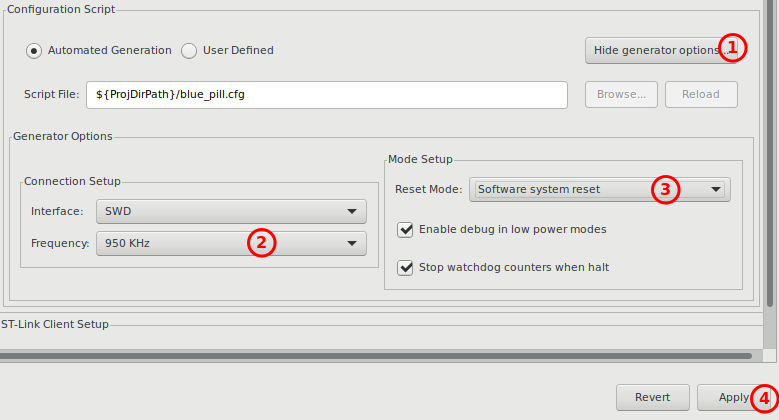
Configure ST-Link connection
Let's test it. Click Run button on main toolbar or select from menu Run - Run. You should see in the console display at the bottom of the window the upload log. Let's try debugging (it's in the same menu). Eclipse prompts to open debug layout (called Perspective). Allow it to do so.
You can evaluate variables by pausing program execution. From what I have seen, only local variables are shown in Variables view.
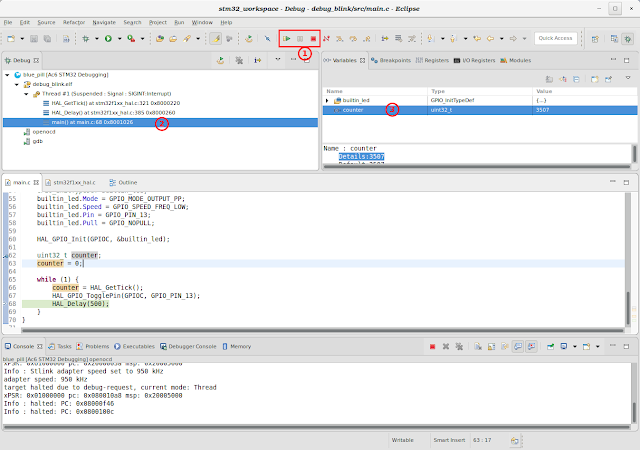
Debug perspective in Eclipse/SW4STM32
Now you can upload binaries straight from Eclipse to STM32 blue pill and you can debug them. If these operations fail on a regular basis, try to adjust SWD clock frequency and attempt connections under reset (start uploading or debugging while holding down reset button on the board; once it starts release it). In the end remember nothing is guaranteed to work with a development board that's sometimes cheaper than the MCU it contains and a clone programmer.


Thanks so much for this. Works perfectly!
ReplyDeleteTt works sometimes and the other times it throws an error.
ReplyDeleteError: init mode failed (unable to connect to the target)
in procedure 'program'
in procedure 'init' called at file "embedded:startup.tcl", line 495
in procedure 'ocd_bouncer'
** OpenOCD init failed **
shutdown command invoked
And a window opens prompting
OpenOCD child process termination
Reason: Wrong device detected
I get errors sometimes too.
Delete