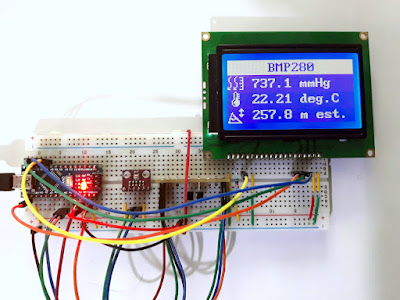
Measure atmospheric pressure and temperature with a BMP280 sensor. Compute altitude from pressure and display all of them on a graphic LCD.
BMP280 is a digital air pressure sensor especially designed for mobile applications. It is a very small device, having a footprint of 2 by 2.5 millimeters. Interfacing with a development board would be difficult if breakout boards wouldn't exist. Even so, there's another issue: sensor's nominal voltage is 1.8 V. Fortunately, it can handle 3.3 volts. BMP280 can measure atmospheric pressure and temperature. Since there is a correlation between pressure and altitude, the latter can be estimated.
I ended up wiring this sensor to a 5 V development board because of the display. Pressure, temperature and altitude required 3 rows, so I used my ST7920 graphic LCD. Although this controller works at 3.3V, the way my display is hardwired by manufacturer does not because you cannot increase contrast enough. I connected the display in SPI mode, so only 4 wires are used (3 for SPI and 1 is reset). The BMP280 supports either SPI or I2C interface. Because the only level shifter I have is one I built a while ago for I2C, this is the protocol I wrote the code for.

The BMP280 sensor on the breadboard
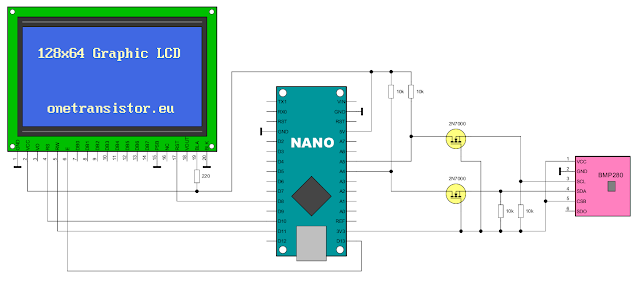
BMP280 gets its power from the 3.3 V output of Arduino Nano. To make it work in I2C mode, the chip select input (CSB) must be high. Do not pull high the SPI data output pin as some claim they did. That's an output pin which must remain floating when not using SPI.

Connections of BMP280 to Arduino with level shifter and display
In the above schematic, the four 10 k resistors and the two FET transistors make the level shifter. You can use a ready made module instead of that. Note that some breakout modules include level shifting circuitry. If you see other's projects where such modules are connected directly to 5 V board, look twice. If your sensor does not have additional parts on the PCB, do not wire it without shifting the voltage!
For the sensor I used BMx280MI library by Gregor Christandl. It supports both SPI and I2C interfaces and is available to install directly in Arduino IDE Library Manager. I like this library because I can configure the sensor the way want. Just after power up, the ADC of the sensor module is disabled and it enters sleep mode. It needs to be configured. There is also an integrated IIR filter which can be configured. The above library lets me set everything according to my needs. Multiple configurations depending on use case are available in datasheet, in Table 7 from section 3.4. I opted for indoor navigation case, with ultra high resolution pressure measurement, lower resolution for temperature and filter enabled. This mode draws the highest current (still, that's only 650 microamps). Pressure resolution is set at 0.16 Pa and temperature resolution is 0.0025 degrees Celsius. Although these numbers are impressive, resolution is not the same as accuracy. Pressure accuracy is ±170 Pa and temperature accuracy is ±1 degree Celsius. The initialization routine for the sensor could look like this, with the settings I chose:
  bmp280.resetToDefaults();
  bmp280.writeOversamplingPressure(BMx280MI::OSRS_P_x16);
  bmp280.writeOversamplingTemperature(BMx280MI::OSRS_T_x02);
  bmp280.writeFilterSetting(BMx280MI::FILTER_x16);
  bmp280.writePowerMode(BMx280MI::BMx280_MODE_NORMAL);
  bmp280.writeStandbyTime(BMx280MI::T_SB_5);
Pressure and temperature are computed from sensor data using a rather complicated algorithm. A non volatile memory holds calibration data. This is read once and used in conjunction with the current ADC readout to compute output values (the library handles it). You get pressure in Pa. I converted it to millimeters of mercury. But, if you want, you can divide it by 100 to have it in hPa instead. Conversion is made when the display string is built.
So, how do we get the altitude? There is a correlation between air pressure and altitude. The BMP280 datasheet doesn't say a thing about altitude, but the datasheet of BMP180 has a section about it and gives the barometric formula.
altitude = 44330 * (1.0 - pow((pressure / 100) / 1013.25, 0.1903));
In this formula, 1013.25 is the pressure at sea level in hPa.
Instead of library, for the display I used my own code. Because ST7920 is a graphic controller with text mode, I find it better to write text in this mode. It saves a lot of memory because fonts are builtin. With four text rows of 16 characters, the display is just what I need. I'm making use of the graphic mode too. I implemented a function that displays a 16x16 icon on the leftmost column of the display.
void ST7920_displayIcon16(uint8_t row, uint8_t *icon) {
  uint8_t y_address = 0x80;
  uint8_t x_address = 0x80;
  if (row >= 2) x_address = 0x88;
  if (row % 2 == 1) y_address += 16;

  for (uint8_t i = 0; i < 16; i++) {
    ST7920_Write(LCD_COMMAND, y_address + i);
    ST7920_Write(LCD_COMMAND, x_address);
    ST7920_Write(LCD_DATA, icon[i * 2]);
    ST7920_Write(LCD_DATA, icon[i * 2 + 1]);
  }
}
To generate icon data, I used the online tool dotmatrixtool.com. There is enough space in ATmega328 flash memory to store three 16x16 bitmaps. Full code is on GitHub.
There is one big disadvantage of this project for anyone who decides to build it. You cannot replace the ST7920 display without making significant changes to the code. Yet, as it is, the code is simple, fast and uses low memory on the MCU.


No comments :
Post a Comment
Please read the comments policy before publishing your comment.