Using the official Minimal CD, you can install any flavour of Ubuntu as long as you have a good internet connection. See how to launch the setup in UEFI mode.
Besides standard disc images, Ubuntu also offers a small image of only ~30...40 MB named
Minimal CD. This contains a text-based installer, so you can use it on computers that fail to load the graphical environment of the installer. Only the packages required to run the installer are on the actual image and anything else will be downloaded from a repository that you can choose.
This has advantages and disadvantages. If you have a fast internet connection, this is actually a good way of installing Ubuntu or any of its
official derivatives like Kubuntu, Xubuntu, Lubuntu or Ubuntu MATE. You will only get the packages you requested at their available versions from the repositories. This means that once installed, your OS will be updated. The disadvantages are of course related to the internet connection. The minimal ISO cannot boot in EFI mode yet you can make it EFI bootable. Also, the text installer may be a little difficult for inexperienced users.
This tutorial shows how to make an EFI bootable media from Minimal ISO and also how to install Ubuntu from it whether you're in EFI mode or not.
The ISO is less than 40 MB, thus it can be burned even on 80 mm CD or you can make a bootable flash drive. This is the perfect choice for any old, low speed USB flash drive. In order to make the bootable USB drive, you can use Rufus on Windows and
dd command on Linux. You can get the Minimal ISO at
http://cdimage.ubuntu.com/netboot/.
EFI boot
You need the 64 bit image. Right click on it and open it with the
Archive Mounter or
Disk Image Mounter. Select all contents and copy them to an empty folder of your choice (I made the
miniefi folder on Desktop). You can unmount the ISO now. In the
boot/grub folder of the extracted ISO you should find a file
efi.img (there is in Ubuntu 15.04 Minimal ISO). Open it with
Disk Image Mounter. You will find here an
efi folder which contains a
boot folder with
bootx64.efi file required for EFI boot. All you have to do is copy the
efi folder from here to the root of the extracted ISO (at the same level as
boot folder from ISO).
 |
| The added efi folder |
Unmount
efi.img. Now, you have two options. You can burn all these files to a data disc with Brasero. Or you can copy them to a FAT32 formatted USB drive. You will get a
bootable media only in EFI mode!
Installation
Following is the installation procedure in EFI mode. Plug in the USB or insert the disc and boot from it. The EFI bootloader is GRUB and this is the boot menu.
 |
| GRUB EFI from Minimal CD |
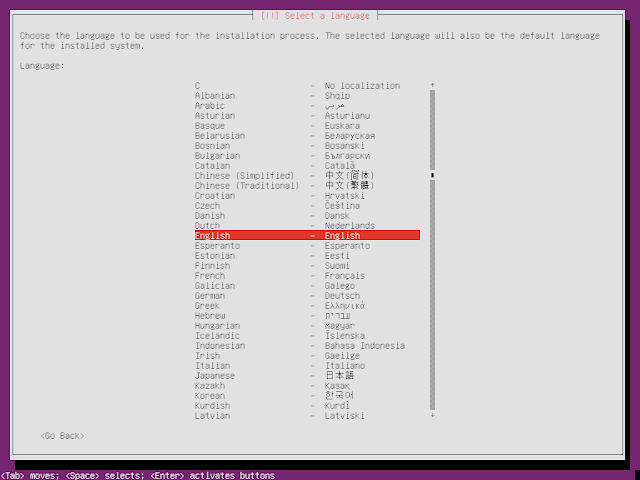
The same menu appears in non-EFI boot too. You should choose the first option. The kernel should load. You are prompted to select a language for the installation. Use the arrows to select and hit Enter to confirm.
 |
| Language selection |
Then select your location for the timezone.
 |
| Location selection |
After that come the locales.
 |
| Locale selection |
Next comes the keyboard layout selection. Choose
no when asked if you want to detect it automatically. You can select it from the list that appears. Ubuntu will try to configure network now. You will be prompted to enter a host name for the computer and to choose the nearest repository.
 |
| Choose the nearest mirror |
You must enter proxy information if needed. After downloading some packages, the installer asks for the default account username and password. It also prompts whether to encrypt user's folder. After selecting the correct time zone, the partitioning tool starts. As always, I prefer to do it manually.
 |
| Choose how to partition the disk |
I'm running this in VirtualBox and I have no partition on the virtual disk. If you want to dual boot, you will
select an unallocated space that you made from the other OS and make a
root partition and a
swap one. I will detail this later, but for now let's select the hard drive and make a partition table (only for those who want to erase the entire HDD).
 |
| Select the hard drive |
Since the HDD is empty, a new partition table will be written on it. Because I started the installation in EFI mode, the partition table will be GPT, although it doesn't say that.
 |
| Choose to create a new partition table |
After selecting
Yes, you will have the required free space to actually install Ubuntu on it. Go ahead and select it. If you are dual booting and already have an operating system installed, this is where you start from.
 |
| Select the free space |
Hit Enter and you will be able to make partitions manually or let the installer autopartition that free space.
 |
| Free space options |
If you select the first option, you must specify the space for the partition.
 |
| Space for the new partition |
After hitting Enter, you will be prompted to select where to place the partition (at the beginning or the end of the disk - choose at the
beginning). This is what you will see next.
 |
| Partition info |
The installer auto assigned this partition the root mount point. But I don not intend to install Ubuntu on a 256 MB partition. Because I started the setup from UEFI and I have no other ESP (EFI system partition) I must make one. I will select
Use as and choose ESP from there.
 |
| Make the ESP partition |
Now I can apply the settings and write this partition to the partition table.
 |
| Confirm partition settings |
You have to repeat these steps to make a root partition (
ext4, mounted at
"/"), if you want a separate home partition (
ext4, mounted at
"/home") and if necessary a swap partition with the size of your RAM memory (
swap zone). If I let the installer partition the free space, here is what I get (this is how you must make it too):
 |
| Final partition table |
You can see the
ESP, the
root partition and the
swap space. Now, let's proceed with installation. A summary of disk changes will appear, select
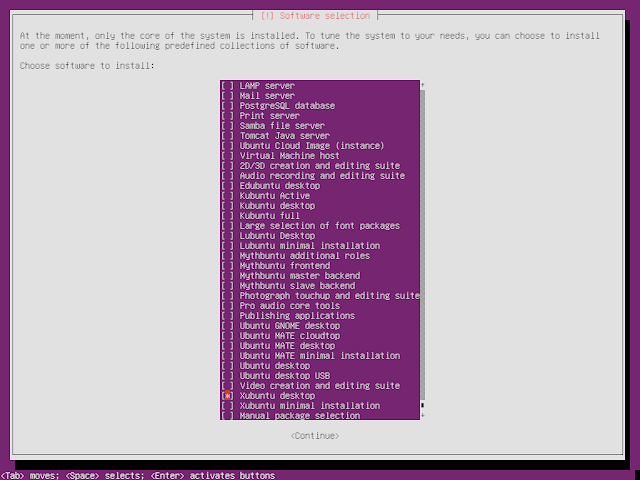
Yes to confirm and write to disk. Ubuntu will start downloading and installing packages. At some point you will be asked what you want to install.
 |
| Choosing to install updates automatically |
 |
| Package selection |
This is the most important. Use Space to select an option then hit Enter.
Ubuntu desktop brings you the default Ubuntu Unity desktop. For this tutorial in VirtualBox, I will go for Xubuntu. The package download and installation continues.
 |
| Installing bootloader |
At last, the bootloader is installed. If you are asked to install a bootloader is recommended to select
Yes. If you have other operating systems installed, they will be detected and added to the boot menu.
You may get another dialog about hardware clock and UTC. You can answer whatever you want, because the clock is updated from the web servers and there shouldn't be any issues. At the end, remove the disc or USB drive and restart.
 |
| Prompt to remove installation media |
That's all. The selected Ubuntu flavour is now installed on your PC. I would have expected this method to be a little more unattended. I hate those configuration dialog appearing at different times during setup thus forcing you to pay attention to the installation. It would have been better if the configuration was completely made at the beginning.
 |
| EFI booted |
The above screenshot proves we're booted in EFI mode.


Hi there, Thanks for the hints
ReplyDeleteBUt I think its quite unclear how to procede
In "EFI boot" paragraph you state to unmount and then copy something inside the iso? which one? the minimal ISo image? or the standard image?
Thanks
You need the 64 bit image. Right click on it and open it with the Archive Mounter or Disk Image Mounter. Select all contents and copy them to an empty folder of your choice (I made the miniefi folder on Desktop). You can unmount the ISO now. In the boot/grub folder of the extracted ISO you should find a file efi.img (there is in Ubuntu 15.04 Minimal ISO). Open it with Disk Image Mounter. You will find here an efi folder which contains a boot folder with bootx64.efi file required for EFI boot. All you have to do is copy the efi folder from here to the root of the extracted ISO (at the same level as boot folder from ISO)
You use only the minimal iso. You extract its contents somewhere. In its contents you will find efi.img. In this image, there is the efi folder which you need to extract to the folder where you extracted the minimal iso. Then, copy everything to a fat formatted usb drive.
Deletewhen i tried to mount efi.img i got an error message saying: "the disk image file is corrupted"
ReplyDeleteefi.img is FAT image. It can be opened using Disk Image Mounter on Ubuntu. I just did this with 18.10 netboot image on 18.04 and it works. Gnome Disks can also attach and mount this image.
DeleteWtf.. its 2020 and its still not possible to boot the mini iso in EFI mode by default? Wasted many hours on this..
ReplyDeleteYou saved me with this post :)