How to use TinyCAD, a free schematic capture software to draw professional looking electronic schematics with custom symbols.
I have chosen TinyCAD because it has quite powerful drawing abilities for a schematic capture software and I found it quite easy to make my own symbols. More than that, it can export netlists that you can use to design the PCB later (I will not be using this feature though).
I have tried TinyCAD before and I quit using it because I didn't like how the schematics look. There are plenty of libraries with many symbols, but there are also duplicate symbols that look different in other libraries. Some look good, some don't. I didn't actually start to use TinyCAD until I made my own libraries that I'm gonna share with you at the end of this post.
Let's start TinyCAD. The first thing to do is set up the grid (Options menu - Settings). It has two preset grids that are just OK. I recommend you use the Normal grid spacing for drawing schematics and the fine grid when drawing symbols. Here comes the first issue you will encounter with the normal grid and default libraries. Not all parts have pins that fall correctly on the grid. This was another reason to make my own libraries. The other issue you will encounter with the default libraries is that some symbols are too large in comparison to the others.
 |
| Setting the grid and a symbol that doesn't fit the grid |
 |
| Add new symbol to library |
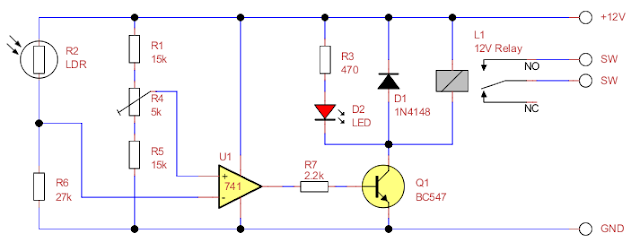
Here is how my finished symbol looks.
 |
| TinyCAD relay symbol |
 |
| LTspice schematic |
 |
| TinyCAD schematic |
And another issue is how do you export the schematic as an image. TinyCAD has File - Export as image file. But here is what you get when you select color and black/white output:
 |
| TinyCAD image export |
Instead I use a different method. I print my schematic to a virtual PDF printer. Then open the PDF with GIMP and import it as 150 DPI image with antialiasing. Then I export to PNG. The result is great. If I want B&W schematic I just change TinyCAD color scheme and put black all over. I don't worry because there's also a reset button there (Options - Colours).
Overall TinyCAD has some bugs but it is a good schematic capture software. It is very configurable and it is quite easy to create new symbols and manage libraries with it. As I promised here are my libraries: download. Just extract them anywhere you want and add them from the Libraries window.
What free software do you use to draw electronic schematics? Have you ever tried TinyCAD?


What you use now for schematic capture ? I am looking for a good schematic capture with less bugs.
ReplyDeleteI'm using KiCad. Version 5 seems to perform OK, but there are schematic symbols whose pins don't match correctly with footprint pins, so I have to make my own.
DeleteHi I`m from Portugal, my name is Vitor and I use TinyCad at many years for me this software works very well and why we dont have one site to upload the Libraries we made?
ReplyDeleteSorry for my poor English.
You can email the developer of TinyCAD and send your libraries. Other users contributed libraries can be downloaded from the official site: https://www.tinycad.net
Deleteguys .. use easyEDA online sch and pcb fab tools - excellent free tool, and it can export in some formats ;)
ReplyDeleteLast time I used TinyCAD was more than 10 yrs ago but stopped using it because of some bugs.
ReplyDeleteI then switched over to SUIGYODO.
(https://www.suigyodo.com/online/e/)
It also offers a basic PCB editor which I used successfully.